So above you can see some of the images. I keep a whole folder on my hard drive like this and it has been growing the more I have been focusing my work. Hopefully that has shown it my progress as a modeler.
Once you have your images, and especially if you have an orthographic image (front, side, back) you will need to now set up your workspace. For Blender I set my units to metric with the unit scale being 0.001 so that it will show in millimeters

Now when you are modeling the model will be the correct size on exporting. Next thing to do is to set up your reference images, if you have them. An orthographic image is great to have since you can literally drag it into your workspace and drop it in. Just make sure you are on the correct axis by clicking on the X or Y (the red or green circle) so that you have a flat view and then drag your image in


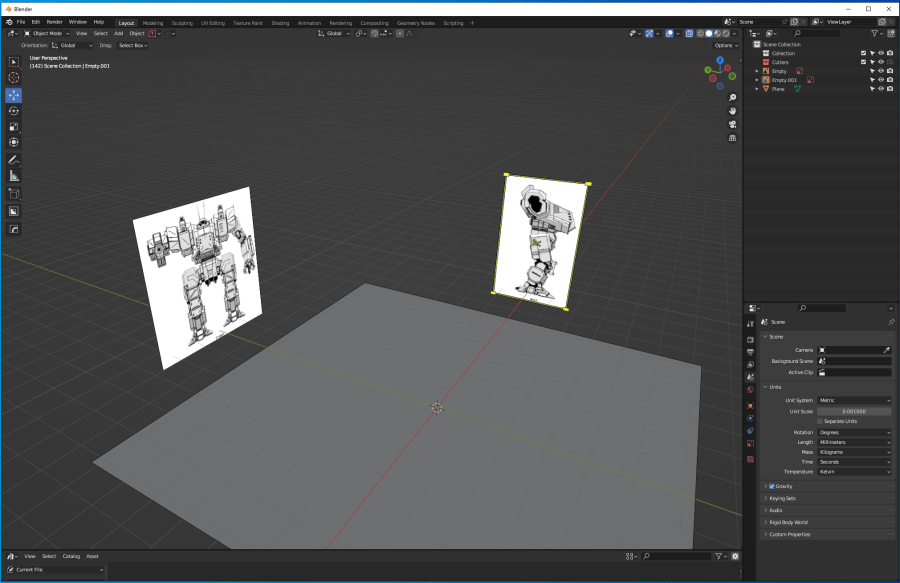
Then you would do the same for the side view so you would have them in the scene like this

If you look at the toolbar on the left, you can see that these two images are now objects in your scene. So you can select them and drag the back some so they are behind and to the side of your modeling if you want. That way they are not in the way. You can also lock them so you don’t accidentally change or move them.
Just make sure when you bring them in that they match on scale. if one is too small, just use the scale tool to bring it up to size.
To get them all on the ground line I just insert a plane and then drag the images so their feet are on the ground plane. I do this because the ground lines don’t show up in front of the images if you look at it on the flat X,Y,Z view so the plane will give you a ground line

Once the are on the ground line, I delete the plane. Now we can get to work.
First thing you want to do, which I actually forgot to do on this one, is have a scale. Yes, I have seen all the arguments about “Well, it’s more about the volume than the height of the mech so you really need to….” I don’t care. I use a height scale to get me in the ballpark. If you have an actual height you can work with, then awesome, you can use the mm scale to get it right on the money.
What I do is use a Spiderman model I found on Cults to put a human in the scene, scale him up to 6mm tall and drop in a mech scale ruler that I made (you can download it free in the store) and then scale up my image to match the mech scale.

Then I start by just boxing things in. In this image you can see the center torso being blocked and I have it in X-Ray mode so I can see through the cube for shaping it. X-ray is at the top right of this image, it’s the third blue box in. Just toggle it on and off as you need.

Now, if you don’t have an ortho image to work with, what do you do?
In my case I still move in the mech scale and Spiderman, and I start blocking, just like I do with having an ortho image. Sometimes it means I have to push and pull blocks around until it looks right, but having the scale there and starting with simple box shapes helps get everything in place before I start cutting and arraigning things.
One other thing I should mention is that I also create different scene collections in the right hand toolbar. One holds reference images, the other one will hold the modeling parts. That way I can lock the reference images, hide them, whatever, and not affect the model.
Also, on many models, there is no need to model the whole thing. Model one side and then you can duplicate and mirror it to the other side. This will save you a ton of work.


Final thought for this part is that, as you can see in the toolbar, everything in this image is individual pieces. Nothing has been joined together or parented yet. That is because I find it easier to do everything as separate parts at first until I have the shape I need. Then I will begin extruding pieces, or joining them together but I first want to have it in the shape and size I need, then start working details.
Next Week – I’ll go over beveling, joining, and cutting pieces.
